Hey everyone, Craig here from With the Bickhams! If you’re anything like us, you know how tough it can be to enjoy your patio during those scorching summer days. Even with a covered patio, the heat can be unbearable. My wife, Melissa, wasn’t enjoying our outdoor space because of it. So, I decided to take matters into my own hands and build an Ice Chest A/C to keep things cool. This is part one of our project where I’ll show you how I got everything started. Let’s dive into the details!
Why an Ice Chest A/C?
The Inspiration
After watching several YouTube videos on DIY portable A/C units, I noticed that most of them used small blowers and 4-inch PVC pipes. I wanted something with more power to really make a difference on our patio, so I decided to use a 15-inch blower I already had. This project took some ingenuity, but I think we’re off to a great start!
The Goal
My aim was to create a system that could cool down our patio significantly. The plan is to use the ice chest to chill the air and then have it circulated by our patio fan, creating a comfortable breeze for everyone sitting outside.
Materials Needed
Here’s a list of materials I used for this project:
- Old Igloo 150-quart ice chest (had it for about 15 years)
- 15-inch blower XPOWER FC-300 Heavy Duty Industrial High Velocity Whole Room Air Mover Air Circulator Utility Shop Floor Fan, Variable Speed, Timer, 14 inch, 2100 CFM, Black, Blue
- 6-inch metal ductwork
- 6-inch adjustable 90-degree elbows
- 8-inch flat tap
- 8″ x 12″ reducer
- 12″ x 16″ reducer
- Microwave rack
- Bricks
- Small pan head self-tapping screws
- Aluminum duct tape
- Silicone sealant (for later)
I picked up most of these items at our local hardware store. You can see all the components and how I used them in the YouTube video below.
Step-by-Step Instructions
Step 1: Planning and Cutting Holes
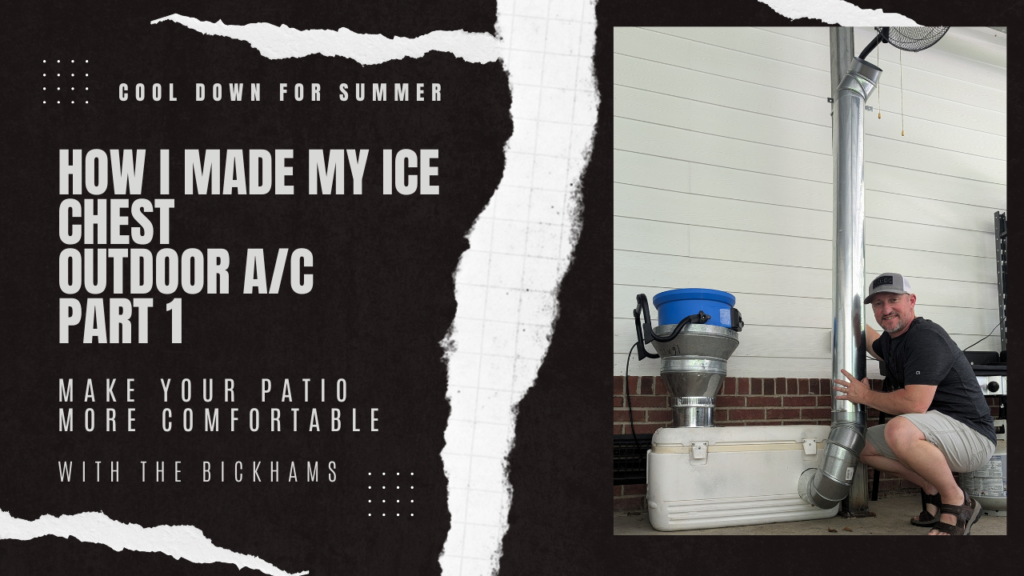
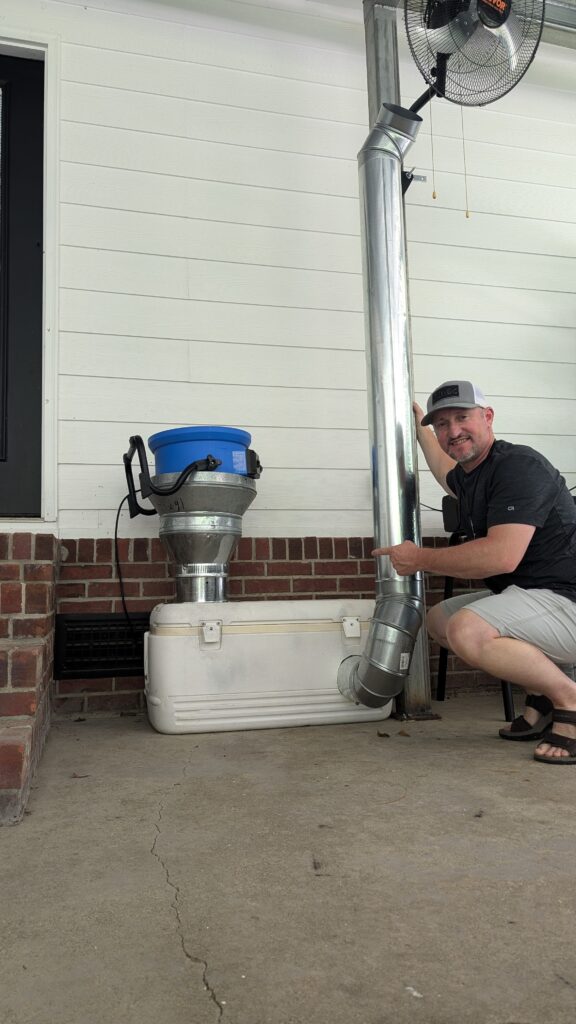
First, I traced out where I wanted to place the components on the ice chest. I installed the flat tap and two reducers on the top and traced around the 6-inch ductwork on the front of the ice chest, making sure to keep it above the drain plug.
Step 2: Preparing the Ice Chest
Next, I used a jig saw to cut the holes. You might find that a reciprocating saw works better because the jig saw blade wasn’t quite long enough to go completely through the ice chest sides.
- Top Holes: These are for the flat tap and reducers to hold the blower.
- Front Hole: This is for the 6-inch ductwork.
Step 3: Setting Up the Internal Air Circulation
I placed an old microwave rack on a couple of bricks inside the ice chest. This keeps the ice off the bottom and allows the air to circulate under and through the ice, then out the 6-inch duct on the front.
Step 4: Assembling the Ductwork
I put everything together using small pan head self-tapping screws. Here’s how it went:
- I cut a piece of ductwork to fit through the front hole, making it 4 to 6 inches long, depending on your needs.
- I cut slits about 1.5 inches long, about one inch apart on one end of the ductwork. This allowed me to fold them up against the inside of the ice chest once I slid the piece through the hole. Attached it with 6 of the self tapping screws on six of the small flaps I cut. Spacing them out evenly.
Step 5: Fitting and Testing
In this part one video, I focused on fitting everything together. I haven’t sealed the cracks with silicone or used the aluminum duct tape on the joints yet. That will come after we do some initial testing to see how well it works.
Future Plans
Testing and Adjustments
Once we’ve done some testing, I’ll seal all the joints with silicone and aluminum duct tape to ensure there are no air leaks.
Final Setup
My plan is to come out of the ice chest and turn the ductwork facing up. I’ll add a five-foot long piece of ductwork to reach up behind our patio fan, which is mounted on a post. The idea is for the cooler air from the ice chest to be sucked through the outdoor patio fan and blown down onto everyone sitting on the patio furniture.
I sure hope this works like my mind says it will! LOL! Stay tuned for the next part of this project where we’ll test and refine the system to get it working perfectly.
Fun Fluff: The Dream of a Cool Patio
Bringing the Dream to Life
Ever since I started dreaming up this project, I’ve been imagining the cool breeze flowing across our patio, making those hot summer days bearable. Picture it: you’re sitting comfortably on your patio furniture, enjoying a nice cold drink, and instead of sweating bullets, you’re feeling a refreshing cool breeze. It’s the dream, and we’re making it happen!
Family Time
Melissa and I love spending time on our patio, whether it’s having our morning coffee, reading a book, or just enjoying the evening together. This Ice Chest A/C is going to make those moments so much more enjoyable, especially when we have friends and family over. I can’t wait to see their faces when they feel that cool air blowing down on them!
Watch the Video
You can see all the steps and materials in action in my YouTube video below. It’s packed with tips and tricks to help you build your own Ice Chest A/C.
[Watch the YouTube video here!](insert video link here)
Check Out More from With the Bickhams
If you enjoyed this project, don’t forget to check out our other DIY and cooking videos. Subscribe to our channel for more great content and hit the notification bell so you never miss an update.
Useful Links:
- Our Cookbook: With the Bickhams Cookbook Volume 1
- Amazon Storefront: Check out our Amazon storefront here
- Vevor Patio Fans: Click Here
- Blower: Click Here
- Aluminum Duct Tape: Click Here
- Ductwork and Screws:
Affiliate Disclaimer: There are affiliate links on this page. If you click a link and make a purchase, I may receive compensation at no additional cost to you.
Legal Disclaimer: I cannot guarantee any results. All the people on this page who use this product may have results that vary. No guarantees of wealth, fame, or success. But hey, at least you tried.
Thanks for stopping by, and I hope you found this guide helpful. Happy DIYing, and I’ll see you next time!
Watch the YouTube video tutorial below!
By following these steps, you might have a functional Ice Chest A/C that’s sure to keep your patio cool and comfortable.(if it works) Stay tuned for part two where we test and refine the setup. Enjoy, and happy DIYing!
Affiliate Disclaimer: There are affiliate links on this page. If you click a link and make a purchase, I may receive compensation at no additional cost to you.
Legal Disclaimer: I cannot guarantee any results. All the people on this page who use this product may have results that vary. No guarantees of wealth, fame, or success. But hey, at least you tried.